> ## Documentation Index
> Fetch the complete documentation index at: https://docs.sprello.ai/llms.txt
> Use this file to discover all available pages before exploring further.
# Annotate and inpaint
> Guide a new generation with on-image annotations, or inpaint a single region.
Sometimes a generation is almost right—the product is perfect, but the background needs to change, or one detail is off. Instead of re-prompting the whole image and hoping the good parts survive, you can open it in Sprello's image editor: **annotate** it with detailed visual guidance and regenerate, or **inpaint** a single region to replace just the part you select.
 ## Open the editor
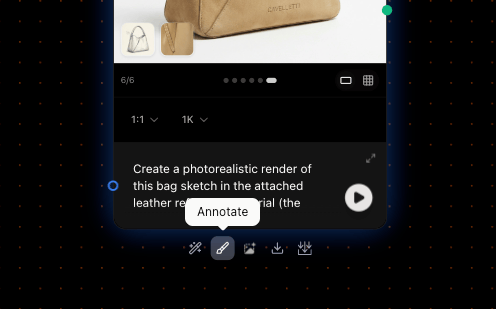
Hover over any generated image—or an editable [Image Input](/nodes/image-input)—and choose **Annotate** from the result's toolbar. The image opens in a full editor you can zoom and pan.
## Annotate: guide a generation
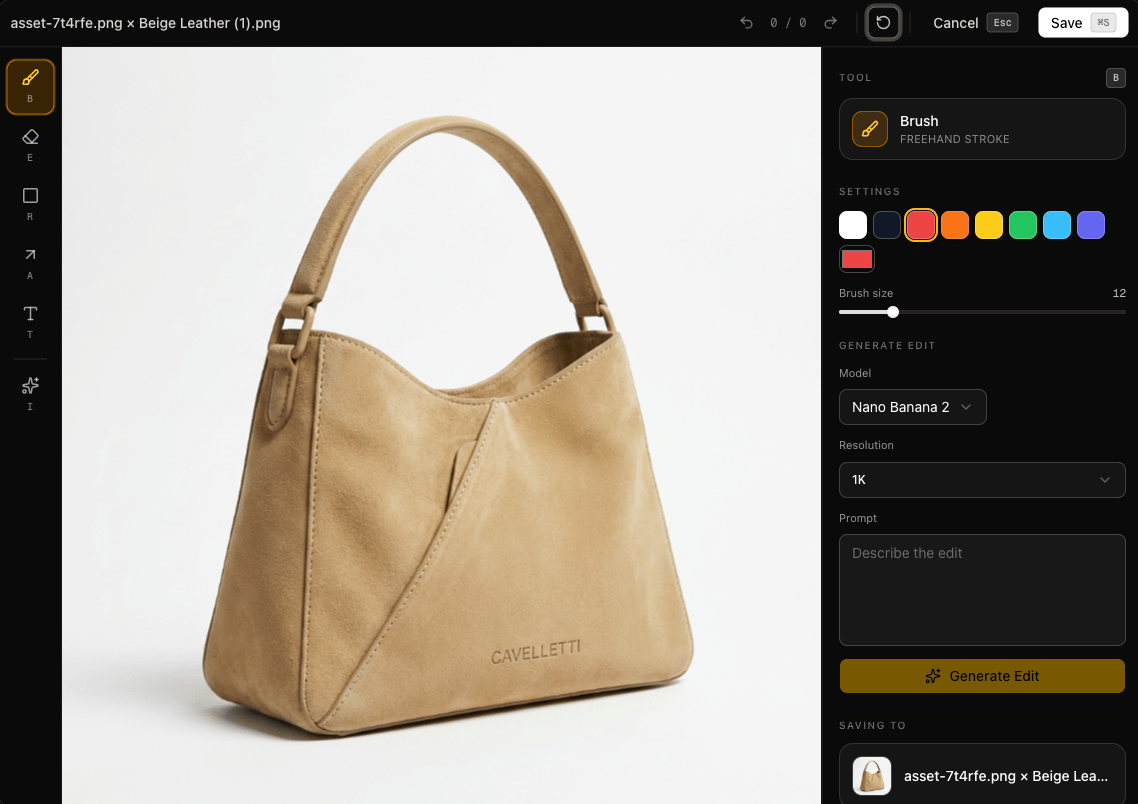
Annotation lets you draw guidance directly onto the image, then regenerate from it. Layer on as much direction as you need—strokes in different colors, arrows tying instructions to exact spots, and several text notes—to steer a result with far more nuance than a single prompt. The annotated image can regenerate in place, or feed a downstream node as a reference.
| Tool | Shortcut | What it does |
| ------------- | -------- | -------------------------------------- |
| **Brush** | `B` | Freehand strokes in the color you pick |
| **Eraser** | `E` | Remove markup you've added |
| **Rectangle** | `R` | Outline a region |
| **Arrow** | `A` | Point at a detail |
| **Text** | `T` | Place a label or instruction |
Set the **color** and **brush size** in the settings panel, and step back with undo and redo at any time. When you **Save**, the annotated image lands on the canvas as a new node—ready to regenerate from, or to feed a downstream node as guidance.
## Inpaint: regenerate a region
Inpainting masks part of the image and regenerates only what's under the mask—everything outside it stays exactly as it was.
Select the **Inpaint** tool (`I`) to move from markup to masking.
Paint over the region you want to replace—a background, a label, a single object.
Write a prompt for what should appear there:
> Replace the background with a sunlit marble surface, keep the bottle untouched
Choose **Nano Banana 2** (the default, faster) or **Nano Banana Pro** (higher fidelity), and a resolution. Sprello preserves your source image's aspect ratio automatically.
Run it. The masked region regenerates into a new [Generate Image](/nodes/generate-image) node connected to your source, so the original stays intact and you can compare.
## Annotate or inpaint?
Both feed your guidance back into a generation—they differ in how you point at what to change.
* **Annotate** when you want to give rich, detailed direction across the image—several colored marks, arrows, and multiple text notes pinned to exact spots. It carries more nuance than a single prompt or a masked region, and drives a new generation, either re-generating this image or guiding a downstream node.
* **Inpaint** when the change is confined to one area—mask that region, prompt it, and regenerate just those pixels in place, leaving the rest untouched.
## Good to know
* Every save lands on the canvas as its own node, so the original, your annotated version, and each inpaint stay available to everything downstream.
## Next
Transfer a look or make a broader edit across the whole image.
## Open the editor
Hover over any generated image—or an editable [Image Input](/nodes/image-input)—and choose **Annotate** from the result's toolbar. The image opens in a full editor you can zoom and pan.
## Annotate: guide a generation
Annotation lets you draw guidance directly onto the image, then regenerate from it. Layer on as much direction as you need—strokes in different colors, arrows tying instructions to exact spots, and several text notes—to steer a result with far more nuance than a single prompt. The annotated image can regenerate in place, or feed a downstream node as a reference.
| Tool | Shortcut | What it does |
| ------------- | -------- | -------------------------------------- |
| **Brush** | `B` | Freehand strokes in the color you pick |
| **Eraser** | `E` | Remove markup you've added |
| **Rectangle** | `R` | Outline a region |
| **Arrow** | `A` | Point at a detail |
| **Text** | `T` | Place a label or instruction |
Set the **color** and **brush size** in the settings panel, and step back with undo and redo at any time. When you **Save**, the annotated image lands on the canvas as a new node—ready to regenerate from, or to feed a downstream node as guidance.
## Inpaint: regenerate a region
Inpainting masks part of the image and regenerates only what's under the mask—everything outside it stays exactly as it was.
Select the **Inpaint** tool (`I`) to move from markup to masking.
Paint over the region you want to replace—a background, a label, a single object.
Write a prompt for what should appear there:
> Replace the background with a sunlit marble surface, keep the bottle untouched
Choose **Nano Banana 2** (the default, faster) or **Nano Banana Pro** (higher fidelity), and a resolution. Sprello preserves your source image's aspect ratio automatically.
Run it. The masked region regenerates into a new [Generate Image](/nodes/generate-image) node connected to your source, so the original stays intact and you can compare.
## Annotate or inpaint?
Both feed your guidance back into a generation—they differ in how you point at what to change.
* **Annotate** when you want to give rich, detailed direction across the image—several colored marks, arrows, and multiple text notes pinned to exact spots. It carries more nuance than a single prompt or a masked region, and drives a new generation, either re-generating this image or guiding a downstream node.
* **Inpaint** when the change is confined to one area—mask that region, prompt it, and regenerate just those pixels in place, leaving the rest untouched.
## Good to know
* Every save lands on the canvas as its own node, so the original, your annotated version, and each inpaint stay available to everything downstream.
## Next
Transfer a look or make a broader edit across the whole image.